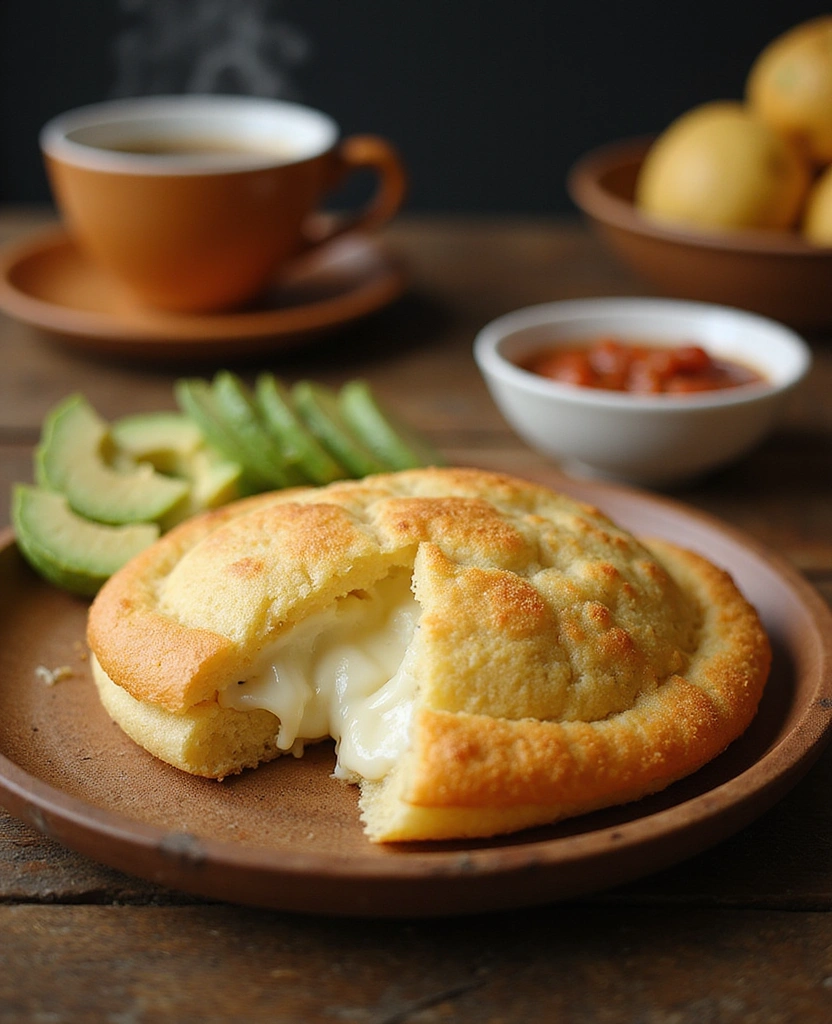
Arepas are a delightful staple in Latin American cuisine, particularly beloved in Colombia and Venezuela.
These versatile cornmeal cakes can be enjoyed at any time of day, filled or topped with a variety of flavorful ingredients.
I first fell in love with arepas during a vibrant street food tour in Bogotá, where each vendor had their own unique twist on this classic dish.
Whether stuffed with cheese, avocado, or savory meats, arepas offer a comforting, satisfying experience that is sure to please everyone at the table.
The History and Cultural Significance
• The Most Delicious Arepas traces its origins to pre-Colombian times, where it was originally created by indigenous tribes in the region now known as Colombia and Venezuela.
• The dish evolved over decades as corn became a staple ingredient, eventually becoming the beloved version we know today, often filled or topped with various ingredients.
• In Colombia and Venezuela, arepas traditionally appear at breakfast or lunch, symbolizing community and shared meals.
• While many variations exist across different regions, the authentic version maintains its corn base and is often grilled or baked to achieve a crispy exterior.
Recipe Overview
Servings: 4
Prep Time: 10 minutes
Active Cooking Time: 20 minutes
Total Time: 30 minutes
Difficulty: Easy
Best Season: Year-round
Special Equipment: Cast iron skillet or arepa grill
Nutritional Information (per serving)
Calories: 250 kcal
Protein: 6 g
Carbohydrates: 35 g
Fat: 10 g
Fiber: 4 g
Sugar: 1 g
Sodium: 200 mg
Essential Equipment Guide
Cast Iron Skillet: This sturdy cookware is perfect for achieving a nice sear and crispy exterior on arepas. Look for a well-seasoned skillet that can retain heat evenly for optimal cooking results.
Arepa Grill: A dedicated grill for making arepas can help you achieve the authentic texture and flavor. If unavailable, any flat griddle or skillet will suffice.
Mixing Bowl: A large mixing bowl is essential for combining the ingredients. Choose one with enough capacity to allow for thorough mixing without spilling.
Key Ingredients Explained
For Arepa Dough:
• 2 cups arepa flour, preferably precooked white or yellow cornmeal – The quality of cornmeal is crucial; look for brands labeled ‘masarepa’ or ‘arepa flour.’ This ingredient provides the base for the dough and contributes a delightful corn flavor.
• 1 ½ cups warm water – Warm water helps to hydrate the flour better, making the dough pliable and easier to shape.
For Filling:
• 1 cup cheese, shredded (queso blanco or mozzarella) – Choosing a good melting cheese enhances the flavor and texture of the arepas. Look for fresh cheese for the best results.
• 1 avocado, sliced – Fresh avocado adds creaminess and richness, balancing the flavors of the arepa.
Preparation Methods
Mixing the Dough: To ensure a smooth and pliable dough, combine the arepa flour and warm water in a mixing bowl. Stir well until all the flour is hydrated, and there are no lumps. Allow the dough to rest for about 5 minutes to let it fully absorb the water.
Shaping Arepas: Divide the dough into equal portions, typically about the size of a golf ball. Flatten each portion gently between your palms to form a disc that’s about ½ inch thick. This technique is crucial for even cooking and achieving the perfect texture.
Cooking Arepas: Preheat your skillet or grill over medium heat. Cook the arepas for about 5-7 minutes on each side until they are golden brown and slightly puffed. This step ensures a crispy exterior while keeping the inside soft and tender.
Step 1: Prepare Ingredients

Gather all the necessary ingredients for making arepas.
This includes arepa flour, warm water, cheese, and avocado.
Make sure to measure the ingredients accurately for the best results.
Having everything ready will streamline your cooking process.
Step 2: Mix the Dough

In a mixing bowl, combine the arepa flour and warm water.
Stir the mixture until all the flour is hydrated and there are no lumps.
Let the dough rest for about 5 minutes to allow it to absorb the water fully.
This resting time is crucial for achieving the right texture in your arepas.
Step 3: Shape the Arepas

Divide the rested dough into equal portions, roughly the size of a golf ball.
Flatten each portion gently between your palms to form discs about ½ inch thick.
Ensure that the arepas are uniform in thickness for even cooking.
Use wet hands if the dough is sticky to prevent it from adhering to your palms.
Step 4: Preheat the Skillet

Place a cast iron skillet or arepa grill on medium heat to preheat.
Allow the skillet to get hot before adding the arepas to achieve a good sear.
You can sprinkle a few drops of water on the skillet; if they sizzle, it’s ready.
This step is crucial to ensure the arepas develop a nice crispy exterior.
Step 5: Cook the Arepas

Carefully place the shaped arepas onto the hot skillet.
Cook them for about 5-7 minutes on each side until golden brown and slightly puffed.
Avoid moving the arepas too much to allow a crust to form.
Look for a crispy exterior and a soft interior as indicators of doneness.
Step 6: Check for Doneness

After cooking, check the arepas by gently pressing them with a spatula.
They should feel firm and slightly spring back.
If they are still soft and doughy, give them a few more minutes on the heat.
Properly cooked arepas should have a golden brown exterior and a soft, fluffy interior.
Step 7: Prepare Fillings

While the arepas are cooking, prepare your desired fillings.
Shred the cheese and slice the avocado for easy assembly.
You can also prepare additional fillings like cooked meats or beans for variety.
Having fillings ready will make it simpler to serve the arepas once they are cooked.
Step 8: Fill the Arepas

Once the arepas are cooked, slice them open with a knife to create a pocket.
Fill each arepa with your choice of cheese, avocado, or other fillings.
Be generous but avoid overstuffing to prevent tearing.
Serve the filled arepas warm for the best experience.
Step 9: Serve and Enjoy

Serve the filled arepas immediately while they are warm.
Garnish with fresh herbs or additional toppings as desired.
Enjoy them alongside your favorite dipping sauces or salsas.
The combination of warm arepas and fresh fillings creates a delightful eating experience.
Critical Timing and Temperature Guide
Mixing Dough: Allow the dough to rest for at least 5 minutes after mixing to ensure it is properly hydrated. This step prevents the arepas from being too dry or crumbly.
Cooking Arepas: Cook each arepa for 5-7 minutes on each side. Look for a golden brown color and a slight puffing up as indicators of doneness. Avoid cooking over too high heat, as this can burn the outside while leaving the inside raw.
Temperature Management: Ensure the skillet is preheated properly before adding arepas. If the temperature is too low, they will absorb too much oil; if too high, they will burn.
Pro Tips for The Most Delicious Arepas
• Ingredient Selection: Use high-quality arepa flour (masarepa) for the best texture and flavor.
• Preparation Secret: Let the dough rest longer for an even softer inside.
• Temperature Management: Maintain a steady medium heat for even cooking; too high can burn the outside quickly.
• Texture Enhancement: For extra crispiness, try lightly brushing the arepas with oil before grilling.
• Flavor Layering: Incorporate spices into the dough or fillings for added depth of flavor.
• Make-Ahead Strategies: Prepare the dough in advance and refrigerate it, but bring it to room temperature before cooking.
• Restaurant-Quality Finishing Touches: Serve with homemade sauces like guasacaca or cilantro crema for an elevated experience.
• Equipment Optimization: Ensure your skillet is well-seasoned for non-stick cooking and optimal flavor.
Troubleshooting Common Issues
• Texture Too Dense: This issue can occur if the dough is overmixed or not rested enough. If your arepas are too dense, ensure you’re using the right flour and allow for proper resting time in the future.
• Flavors Unbalanced: If your arepas are bland, consider adding salt or spices to the dough. Always taste your fillings before adding them to ensure they complement the arepa.
• Arepas Not Puffing Up: This may happen if the dough is too dry or the skillet is not hot enough. Ensure proper hydration of the dough and preheat your skillet adequately.
• Burnt Exterior: If your arepas are burning before cooking through, lower your heat. Cooking at a consistent medium temperature is key.
• Too Sticky to Handle: If your dough is sticky, wet your hands lightly to prevent sticking. Adjust your flour-to-water ratio if necessary in future batches.
Variations and Regional Differences
• Venezuelan Arepas: Often thicker and stuffed with a variety of fillings like shredded beef or chicken, these arepas are a staple in Venezuelan cuisine with endless variations.
• Colombian Arepas: Typically thinner and often served with cheese melted inside, these arepas focus on the simplicity of corn flavor.
• Sweet Arepas: Some variations include sugar or sweeteners in the dough, making them a delightful treat for breakfast or dessert.
• Modern Interpretations: Contemporary versions may include gluten-free alternatives or introduce ingredients like quinoa or spices for a unique twist.
Food Science Behind the Recipe
• Gelatinization: This process occurs when the starches in the cornmeal absorb water and swell, creating the soft structure of the arepas. Understanding this helps in achieving the right dough consistency.
• Maillard Reaction: This chemical reaction between amino acids and reducing sugars gives the arepas their appealing golden-brown crust. Proper heat management is crucial for maximizing this effect.
• Emulsification: The blending of fats and water in the dough contributes to the arepa’s texture. Knowing how to balance moisture and fat will improve the final product.
Frequently Asked Questions
What’s the most common mistake people make when preparing arepas? Overmixing the dough can lead to a dense texture; mix just until combined.
Can I prepare components of this dish in advance? Yes, you can prepare the dough ahead of time and refrigerate it. Just bring it to room temperature before cooking.
How do I adapt this recipe for dietary restrictions? Use gluten-free arepa flour for a gluten-free version and experiment with fillings to meet dietary needs.
What’s the best way to store and reheat leftovers? Store them in an airtight container in the fridge for up to 3 days. Reheat on a skillet until warmed through.
Can I freeze this dish? Yes, you can freeze uncooked arepas. Thaw and cook them directly from the freezer, adding a few extra minutes to the cooking time.
What wine or beverages pair best with this dish? Light white wines like Sauvignon Blanc or fruity beverages like fresh lemonade complement the flavors well.
How can I scale this recipe up for a crowd? Simply multiply the ingredient amounts while ensuring even mixing and cooking time adjustments.
What side dishes complement this recipe best? Serve with a fresh salad or a light soup for a complete meal.
How do professional chefs elevate this dish for restaurant service? Incorporating gourmet fillings and precise presentation techniques can elevate the experience significantly.
Serving and Presentation Guide
• Traditional Presentation: Arepas are typically served stacked on a wooden board or plate, garnished with fresh herbs and accompanied by dipping sauces.
• Modern Plating Ideas: Consider plating arepas on individual small plates with colorful toppings arranged artistically for a contemporary touch.
• Accompaniment Suggestions: Pair arepas with fresh guacamole, salsa, or a light salad to enhance the overall meal experience.
• Special Occasion Presentation: For celebrations, serve arepas on a tiered platter with an array of fillings for guests to choose from, adding decorative garnishes for visual appeal.
Conclusion
Now that you have the tools and knowledge to craft the most delicious arepas, it’s time to get cooking.
I hope you enjoy experimenting with different fillings and flavors as much as I do.
Gather your friends and family around the table to savor these delightful treats together.



Leave a Reply